Warning: Computers do not leave your desk and lab materials do not leave lab area.
Task 1: Metaphors for Compositions of the Layers
Procedure: Imagine that you’re a 5th grade science teacher and you have to create a lab for your students. You need to explain to them, with visuals, what the inside layers of the Earth look and feel like. What materials could you buy from the store or find at home to demonstrate the properties of the inner Earth? In other words, you are creating a SAFE, hands-on, model of the inner Earth for your students. For example, you could use a metallic colored shampoo to simulate the outer core. Come up with a product for each of the following layers:
1. Lithosphere:
2. Asthenosphere:
3. Mesosphere:
4. Outer Core:
5. Inner Core:
1. Lithosphere:
2. Asthenosphere:
3. Mesosphere:
4. Outer Core:
5. Inner Core:
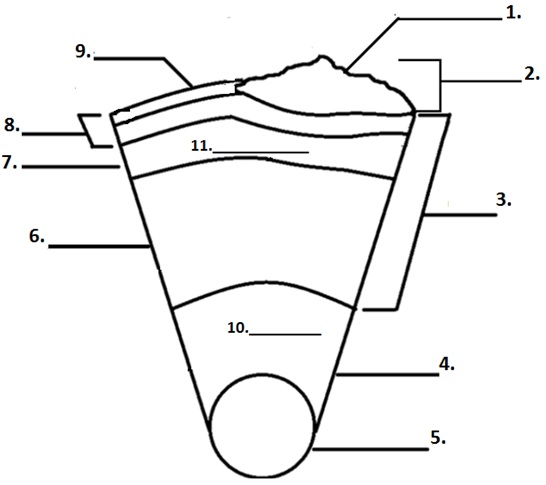
Task 2: Diagram of Layers of Earth
Procedure: Properly label each of the 9 layers of the Earth and explain the 2 sets of convection currents (i.e., What do the convection currents in the mantle and outer core do/create?).
Task 3: Seismic Waves
Procedure:
Step 1: Background- Humans do not have the technology to drill any deeper than the crust of the Earth. The pressures and temperatures are too great for current technology to drill into the mantle. So the question is, how do scientists know the composition and depth of each layer, if they have never physically observed the layers? Simple, seismic waves. Seismic waves from earthquakes are measured and these waves through the Earth act differently based on the material they are traveling through.
Step 2: Read pages 125-127.
Step 3: Watch the video on using seismic waves to understand the layers of the Earth and take notes.
-Focus on these points
-Differences between P & S waves
-How scientists know what the layers are composed of and where plate boundaries are located.
- Shadow zones
Step 4: Put a film canister to your ear and flick the canister with your finger. Do this separately for each canister. Do you hear the differences in sound between the two canisters? The differences in sound waves are similar to seismic waves. One canister has water and one sand.
Which canister is liquid and which is solid? Make a hypothesis and then open the canisters.
Step 5: Now try the same process with the two large canisters.
Questions:
1. Explain how scientists use seismic waves to distinguish between the layers of the Earth.
a. How do they know depths and boundaries of the layers?
b. How do they know the compositions (i.e., made of) of the layers?
2. How does the lab simulate how scientists use seismic waves to distinguish the boundaries and compositions of the inner Earth?
Task 4: Differences between Electromagnets and Permanent Magnets
Step 1: Watch ONE of the two videos on magnets.
|
|
|
Step 2: Use wire, a nail, and a battery to make an electromagnet. Use it to pick up staples.
Step 3: Use the magnetizer to create a permanent magnet from the following objects, by aligning the domains in the metal:
1. paperclip or nail or screw (something made of iron)
2. copper or nickel coin
3. aluminum pop can tab or foil
-Is all metal magnetic? No, only some can be magnetized. Gold, silver, nickel, aluminum, & copper are not magnetic?
Step 4: Watch Mr. Jacobs’ magnet demonstration.
Questions:
1. Are all metals magnetic?
2. Draw a picture that shows domains that are not aligned or magnetized, and then draw a picture that shows magnetized domains.
3. Explain the differences between permanent magnets and electromagnets.
4. Explain why the core of the Earth must be an electromagnet.
Task 5: Compasses
Step 1: Watch the video on how to make a compass and follow the steps to make a compass.
(Use an unfolded paperclip instead of a needle.)
(Use an unfolded paperclip instead of a needle.)
Step 2: Watch the video on how to use a compass.
Questions
1. Why does the compass needle always point to the north?
2. Explain how to use a compass.
1. Why does the compass needle always point to the north?
2. Explain how to use a compass.
